First look – Google Nexus 5X
Let’s get started.
First of all, let’s make sure you have everything you need. Inside the box* you should find:
- 1 x Nexus 5X
- 1 x power adaptor
- 1 x USB type-C cable
- 1 x information pack
- SIM tray removal tool
*some box contents may vary
We’ll guide you through startup and tell you a bit about your phone’s features.
Note: software updates happen frequently, so your phone may look a little different.
Tips & tricks
Start: insert the SIM card in your phone and charge up. Then power on and follow the screen prompts to set up your phone.
Note: certain apps and features may not be available in all countries.
Start
Put in the cards & power on
The Nexus 5X uses a nano SIM card.
SIM card tray location
The SIM card tray is on the top left side of the phone. The eject button is inside the small hole on the right side of the tray door.
Directions

Turn off your phone and find the small hole for the SIM card tray. Insert the SIM ejection tool that comes with the phone into the hole.
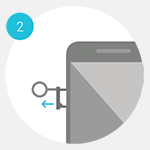
Push firmly but gently until the tray pops out.
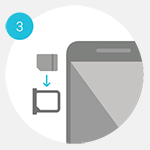
Remove the tray and place the nano SIM card inside it.
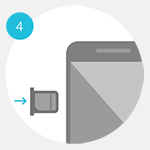
Carefully reposition the tray in the slot and push it gently back into the phone.
Charge your phone fully and turn the power on.
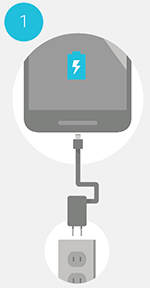
Connect either end of the USB Type-C cable to the USB Type-C port on the bottom of the phone. Then connect the other end of the cable to the charger, and the charger to a power outlet.
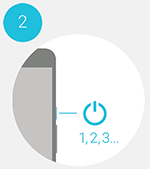
To turn the phone on, press and hold the power button on the right side for a few seconds.
Tips
The Nexus 5X uses a USB Type-C port to charge, so other Android cables and chargers may not work with your device. We recommend using the charger that came with your Nexus.
If you want to use a USB Std-A charger that you already have, you’ll need to get a new cable—USB Type-C to USB Std-A. However, your device will charge slower than it would with a Type-C charger.
You can buy additional chargers and cables from the Google Store.
The best power source is the charger that came with your phone. Other sources, such as a laptop, may not charge as quickly.
You can use your phone while charging, but your phone will charge faster when you’re not using it.
Note
The battery can’t be removed. Don’t attempt to open the phone.
The charger varies by country or region.
The input voltage range between the wall outlet and this charger is AC 100V–240V, and the charger’s output voltage is DC 5V, 3A.
For best results, use the supplied charger and Type-C cable when charging your Nexus 5X.
Turn on your phone. You may need to restart your phone in order to start getting cell service.
Accessibility Options
Android devices offer exceptional built-in accessibility options and third-party accessibility applications. RAZ Mobility has an extensive section dedicated to accessibility. Read more >>>
Power on & Sign in
Push the power button to turn it on, holding it in for a few seconds until you feel a vibration. The phone will turn on, displaying the setup wizard. Just follow the screen prompts to get started.
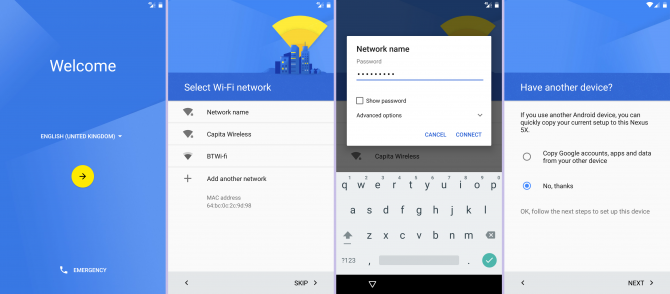
Set your language. If your language isn’t already set as the default, tap on the text above the yellow circle to choose a different language. Press the yellow circle to continue to the next step.
To connect to Wi-Fi you need to be in range of your wireless router. If you are in range of it, you should see the name of your router appear in the pst of Wi-Fi networks. Tap on it to continue, or press skip to ignore Wi-Fi.
Enter the wireless password when prompted. This may be shown on a sticker on your router, and is sometimes referred to as a WEP key, WPA key or wireless passphrase. Check your typing if you wish by tapping the Show password box, and when you are ready to proceed tap Connect.
If you’re switching from another Android phone to a new Nexus 5X, you can import data between handsets using NFC. If this is an entirely new handset, choose no, thanks and tap on the next button.
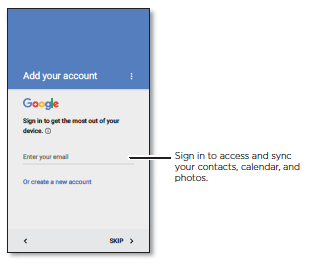
If you use Gmail™, you already have a Google™ account – if not, you can create an account during setup. Signing in to your Google account lets you access, sync and back up your stuff. See your Google apps, contacts, calendar, photos and more.
Tips and tricks
Wi-Fi network: for faster Internet access or to conserve mobile data use, swipe the status bar down with two fingers, then tap > Wi-Fi.
Accounts: to add, edit or delete accounts, swipe up > Settings > Accounts.
For help with your Google account, visit www.google.com/accounts.
Note: this phone supports apps and services that may use a lot of data, so make sure your data plan meets your needs. Contact your service provider for details.
Quick start: Home screen & apps
The Home screen is what you see when you turn on your phone. From here you can explore apps and more.
Note: software updates happen frequently, so your screen may look a little different.
Get around on your device
These tips and tricks can help you get familiar with the basic features that you’re likely to use on your Android device.
Note: Android isn’t the same on all devices. These instructions are for devices running Android 7.1.2 and up.
Get to know your Home screens
Your Home screens are what you see when you don’t have an app open.
Go to your Home screens from anywhere
To get back to your Home screens, tap Home  .
.
Swipe between Home screens
You can have multiple Home screens. Swipe right or left to move between them.
Move between screens and apps
At the bottom of every screen, you’ll see 3 navigation options:
Back 
Open the last screen you visited, even if it was in a different app. You can go back more than once, but when you reach the Home screen, that’s as far back as you can go.
Home
Open the center Home screen.
Overview 
See recently viewed apps and browser tabs.
To open an app or tab, tap its image.
To exit an app or tab, swipe its image left or right.
To use sppt screen, touch and hold an image, and drag that image to the top of your screen.
To switch between your 2 most recent apps or tabs, double tap Overview .
In some apps, like games, these icons can go away when you’re not using them. To bring them back, tap the bottom of your device’s screen.
Search with your voice (“Ok Google” and your Google Assistant)
At the top of your Home screens, you’ll find Google Search. Search lets you search your phone or the Internet.
To type search terms, tap the Google icon.
To speak search terms, or to take an action by voice, say “Ok Google” or tap the Microphone  .
.
Tips and tricks
Return: to return to the Home screen from any location, tap Home .
Pages: to add a page, drag an app to the right side of the screen until you see a white bar. You can add multiple pages. To see other pages of shortcuts and widgets (if available), swipe the Home screen left.
Settings: to quickly open common settings, swipe the status bar down with two fingers. To open more settings, tap  .
.
Shortcuts: swipe up , touch and hold an app, then drag it to one of your Home screen pages.
Apps: to remove an app from a Home screen page, touch and hold the app, then drag it to Remove. (The app isn’t removed from your phone, just the Home screen.)
To uninstall apps from your Home screen, touch and hold the app, then drag it to Uninstall. (You can’t uninstall some apps.)
See & use notifications
Notifications alert you to things like new messages, calendar events, and alarms.
Some notifications show individually. Other notifications from a single app get bundled together.
Note: Android isn’t the same on all devices. These instructions are for devices running Android 7.1.2 and up.
Where to find your notifications
Status bar icons
At the top of your screen, you’ll see your status bar.
• The icons on the left show you when you have new notifications.
• The icons on the right show you the status of things like your Wi-Fi connection and battery level.
Notifications shade
Swipe down on your screen
To read your notifications, swipe down from the top of your screen.
Swipe down on your fingerprint sensor
You can also read your notifications by swiping down on your fingerprint sensor. To turn this gesture on or off, open your device’s Settings app and tap Moves.
Icons at the top right of the screen tell you about phone status:
 .
.

 .
. .
. .
. Settings.
 shows when Bluetooth is on.