LG G Pad F
GETTING STARTED

First look – LG G Pad F

Let’s get started.


First of all, let’s make sure you have everything you need. Inside the box* you should find:
  • 1 x LG G Pad F
  • 1 x power adapter
  • 1 x USB cable
  • 1 x information pack
*some box contents may vary

We’ll guide you through startup and tell you a bit about your tablet’s features.

Note: software updates happen frequently, so your tablet may look a little different.

Get to know you LG G Pad F tablet

Front

Back
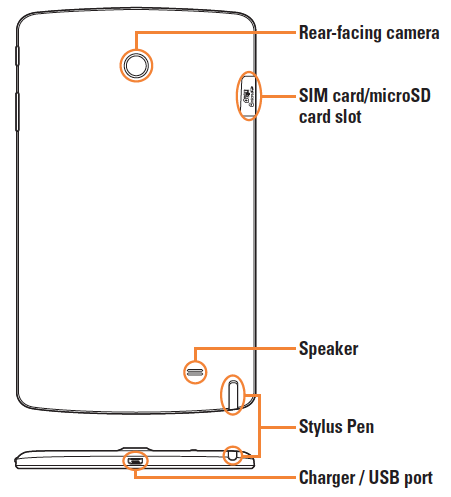
Front-facing camera Use to take pictures and record videos of yourself. You can also use this for video chatting. Keep it clean for optimal performance.
Power/Lock key Press to lock/unlock the screen. Press and hold to turn the tablet on/off, restart it, and activate/deactivate airplane mode.
Volume keys Allow you to adjust the media volumes. Press and hold both keys at the same time to access the QuickMemo+ while screen is unlocked. Press and hold Down or Up to access the Camera while screen is off or locked.
Earphone jack Allows you to plug in an optional headset for convenient, hands-free conversations. You can also plug in headphones to listen to music.
Infrared (IR) LED Used as a sensor for the QuickRemote app.
SIM card/MicroSD card slot Allows you to insert your SIM card and a microSD card.
Microphone Records your voice and allows use for voice-activated functions.
USB peripheral port Allow you to connect a USB peripheral, such as a keyboard, mouse, and external storage to your tablet. Also allows you to charge another device.
Charger / USB port Allows you to connect the tablet and the USB cable for use with the charger adapter, your PC, or other compatible accessories.
Rear-facing camera Use to take photos and record videos. Keep it clean for optimal performance.
Speaker Use to listen to the audio from the selected function (e.g., music, videos, sound clips, etc.).
Stylus Pen Allows you to use a convenient stylus pen that you can use to input commands and navigate your device. It also works well with popular writing and drawing applications. To use the stylus, slide it out from the bottom of the device.

Start

Charge your tablet fully and turn the power on.

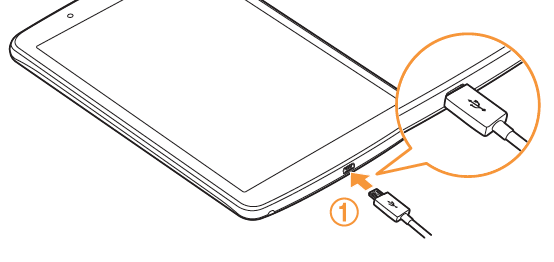
Connect either end of the USB cable to the USB port on the bottom of the tablet. Then connect the other end of the cable to the charger, and the charger to a power outlet.
To turn the tablet on, press and hold the power button on the right side for a few seconds.  

Tips

We recommend using the charger that came with your LG G Pad F tablet.
The best power source is the charger that came with your tablet. Other sources, such as a laptop, may not charge as quickly.
You can use your tablet while charging, but your tablet will charge faster when you’re not using it.

Note

The battery can’t be removed. Don’t attempt to open the tablet.
The charger varies by country or region.
The input voltage range between the wall outlet and this charger is AC 100V–240V, and the charger’s output voltage is DC 5V, 3A.
For best results, use the supplied charger and cable when charging your LG G Pad F.
Now, it’s time to turn your LG G Pad F on and move on to the Setup Wizard!

Turn on your tablet.

Accessibility Options

Android devices offer exceptional built-in accessibility options and third-party accessibility applications. RAZ Mobility has an extensive section dedicated to accessibility. Read more >>>

Power on & Sign in

Push the power button to turn it on, holding it in for a few seconds. The tablet will turn on, displaying the setup wizard. Just follow the screen prompts to get started.

Set your language. If your language isn’t already set as the default, tap on the text above the yellow circle to choose a different language. Press the yellow circle to continue to the next step.

To connect to Wi-Fi you need to be in range of your wireless router. If you are in range of it, you should see the name of your router appear in the list of Wi-Fi networks.

Enter the wireless password when prompted. This may be shown on a sticker on your router, and is sometimes referred to as a WEP key, WPA key or wireless passphrase. Check your typing if you wish by tapping the Show password box, and when you are ready to proceed tap Connect.

To copy any Google Accounts backup up apps and data from your existing Android devices, tap Copy your Google Accounts, apps, and data from your other device or tap No thanks then tap NEXT
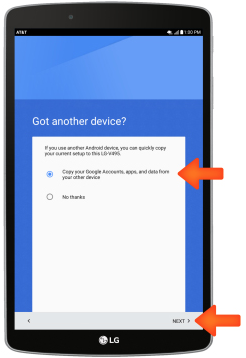
If you use Gmail™, you already have a Google™ account – if not, you can create an account during setup. Signing in to your Google account lets you access, sync and back up your stuff. See your Google apps, contacts, calendar, photos and more.

Tips and tricks

Accounts: to add, edit or delete accounts, swipe up > Settings > Accounts.
For help with your Google account, visit www.google.com/accounts.

Quick start: Home screen & apps

The Home screen is what you see when you turn on your tablet. From here you can explore apps and more.
Note: software updates happen frequently, so your screen may look a little different.

Get around on your device

These tips and tricks can help you get familiar with the basic features that you’re likely to use on your Android device.
Note: Android isn’t the same on all devices. These instructions are for devices running Android 7.1.2 and up. Get to know your Home screens
Your Home screens are what you see when you don’t have an app open.
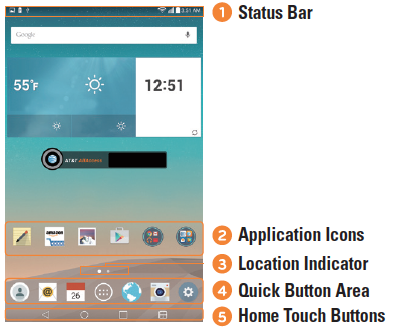

Back Button Returns to the previous screen. Also closes pop-up items, such as menus, dialog boxes and the on-screen keyboard.
Home Button Return to the Home screen from any screen. Touch and hold to access the Google Now shortcut.
Recent Apps Button Displays recently used applications. If you touch and hold this button, it opens a menu of available options.
Dual Window button Tap to change to dual window mode. It allows you to manage two different apps at the same time by splitting the screen in two.

Go to your Home screens from anywhere

To get back to your Home screens, tap Home .

Swipe between Home screens

You can have multiple Home screens. Swipe right or left to move between them.

Move between screens and apps

At the bottom of every screen, you’ll see 3 navigation options:

Back

Open the last screen you visited, even if it was in a different app. You can go back more than once, but when you reach the Home screen, that’s as far back as you can go.

Home

Open the center Home screen.

Overview

See recently viewed apps and browser tabs.

To open an app or tab, tap its image.
To exit an app or tab, swipe its image left or right.
To use split screen, touch and hold an image, and drag that image to the top of your screen.
To switch between your 2 most recent apps or tabs, double tap Overview .
In some apps, like games, these icons can go away when you’re not using them. To bring them back, tap the bottom of your device’s screen.

Search with your voice using “Ok Google”

At the top of your Home screens, you’ll find Google Search. Search lets you search your tablet or the Internet.
To type search terms, tap the Google icon.

To speak search terms, or to take an action by voice, say “Ok Google” or tap the Microphone .

Tips and tricks

Return: to return to the Home screen from any location, tap Home.
Pages: to add a page, drag an app to the right side of the screen until you see a white bar. You can add multiple pages. To see other pages of shortcuts and widgets (if available), swipe the Home screen left.
Settings: to quickly open common settings, swipe the status bar down with two fingers. To open more settings, tap .
Shortcuts: swipe up , touch and hold an app, then drag it to one of your Home screen pages.
Apps: to remove an app from a Home screen page, touch and hold the app, then drag it to Remove. (The app isn’t removed from your tablet, just the Home screen.)
To uninstall apps from your Home screen, touch and hold the app, then drag it to Uninstall. (You can’t uninstall some apps.)

See & use notifications

Notifications alert you to things like new messages, calendar events, and alarms.
Some notifications show individually. Other notifications from a single app get bundled together.

Note: Android isn’t the same on all devices. These instructions are for devices running Android 7.1.2 and up.

Where to find your notifications

Status bar icons

At the top of your screen, you’ll see your status bar.

  • The icons on the left show you when you have new notifications.
  • The icons on the right show you the status of things like your Wi-Fi connection and battery level.

Notifications shade

Swipe down on your screen

To read your notifications, swipe down from the top of your screen. Icons at the top right of the screen tell you about tablet status:

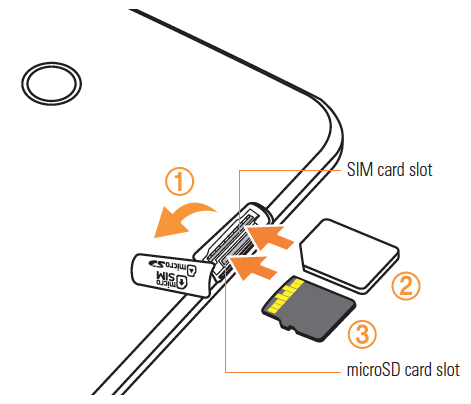
Installing micro SIM card & microSD card

Before you can start exploring your new device, you need to set it up.
Your device supports the use of microSD memory cards of up to 128GB capacity. Multimedia contents can be saved in the microSD card.
1. Open the SIM/microSD slot cover.
2. Slide the SIM card into the upper slot as shown in the figure below. Make sure the gold contact area on the card is facing downward.
TUTORIALS

Ok Google

Get started with the “Ok Google” on your tablet

You can find info and get things done with the help of “Ok Google”. Ask it questions and tell it to do things.

Talk or type to “Ok Google”

Talk

  • On your tablet, type the microphone symbol in the Google search bar or say “Ok Google.” (If you haven’t already, turn on “Ok Google”)
  • Ask a question or say a command.

Type

  • On your tablet, tap the Google search bar.
  • Enter a question or command using the keyboard  search button.

What you can ask “Ok Google” on your tablet

You can ask your “Ok Google” for information and for help with everyday tasks.

Start a conversation

  • On your tablet, touch & hold the Home button or say “Ok Google.”
  • To type instead of talk, tap Keyboard .

Examples of what you can ask

To get ideas, ask “What can you do?” Your Assistant can help you:

Get local info

  • Weather: What’s the weather today?
  • Food: Find pizza restaurants nearby.
  • Business hours: Is Walgreens still open?
  • Navigation: Navigate home.

Communicate

  • Emails: Send an email.
  • WhatsApp: Send a WhatsApp message to Sam.

Plan your day

  • Alarms: Wake me up at 7 a.m.
  • Traffic: How’s the traffic to work?
  • Reminders: Remind me to do laundry when I get home. Remind me to call Mom every Sunday.
  • Flights: Is United flight 1463 on time?
  • Make reservations: Make a reservation for two at Cascal next week.

See photos & media

  • Photos: Show my pictures of the beach.
  • Music: Play some Jazz music. Next song.
  • YouTube: Watch a cute puppy video on YouTube.

Ask Google

  • Game updates: Who won the Warriors game?
  • Calculations: What’s 20% of 80?
  • Dictionary: What does “gregarious” mean?
  • Translations: How do I say “Nice to meet you” in French?
  • Search: Search for summer vacation ideas.
  • Image search: Find pictures of kittens.
  • Web answer: How do you remove wine stains from a rug?

Control your smart home

  • Lights: Dim the living room lights.
  • Thermostats: Set the heat to 70. Lower the temperature 2 degrees.  

Get around your tablet

  • Change settings: Turn on WiFi. Increase the volume. Decrease the brightness.
  • Control your tablet: Turn on the flashlight.
  • Find things in your apps: Search for tablets on Amazon. Search for Kanye West on Twitter.

Have fun

  • Get to know your Assistant: Do you dream? What’s your favorite color?
  • Games: Let’s play a game. Give me a trivia question.

Entertainment:

Tell me a joke. Tell me something interesting.

Control your settings

  • Check and change common settings
  • From the top of your screen, swipe down once with one finger to see the Quick Settings short bar, or with 2 fingers to see the full panel.
  • See all settings
  • Adjust settings for your network, sound, security, and more in your device’s Settings app . Open the Settings app .

Quickly change common settings

Get to settings you use often — like brightness, airplane mode, and battery — from anywhere on your device with Quick Settings.

Note: Android isn’t the same on all devices. These instructions are for devices running Android 7.1 and up.

Open Quick Settings

To see your short Quick Settings bar, swipe down once from the top of an unlocked screen.

To see your full Quick Settings panel:

  • If your tablet is locked, swipe down once.
  • If your tablet is unlocked, swipe down once with 2 fingers, or twice with one finger.
  • If your Quick Settings bar is open, tap the Down arrow .

Adjust settings or see status details

To turn a setting on or off, or to see its status:

  • Open Quick Settings.
  • Tap the setting. Settings are white when on, and dimmed when off.

To see more options for a setting:

  • Open Quick Settings.
  • Touch & hold the setting.

Add, remove, or move a setting

To add, delete, or change the order of your settings:

  • Open Quick Settings.
  • Tap Edit .
  • Touch and drag settings to where you want them.
    • To add a setting, drag it up from “Drag to add tiles.”
    • To remove a setting, drag it down to “Drag here to remove.”

Your first several settings tiles become your Quick Settings bar.

Recognize settings & shortcuts

In your Quick Settings panel, most settings show their names. Your Quick Settings bar and status bar show icons only. 

Manage screen & display settings

You can change your screen’s brightness, font size, display size, rotation settings, and more.

Note: Android isn’t the same on all devices. These instructions are for devices running Android 7.1.1 and up.

Change display settings

  • Open your device’s Settings app .
  • Under “Device,” tap Display.
  • Tap the setting that you want to change.

Use screen brightness settings

Brightness level

  • To set your screen’s brightness, tap Brightness level and move the slider .

Adaptive brightness

  • To automatically fit your screen’s brightness to the light around you, use Adaptive brightness. Adaptive brightness is on by default. You can adjust your brightness level while adaptive brightness is on.

Night Light

  • To make it easier to look at your tablet in dim light, you can reduce your screen’s blue color. You can set Night Light to turn on automatically from sunset to sunrise, or at other times.

Use display settings

Screen settings

Wallpaper

  • Choose from default wallpapers, live wallpapers, and your photos.

Sleep

  • Change how long it takes for your device’s screen to go black when you’re not using it.

Screen saver

  • Set up a screen saver to show photos, colorful backgrounds, and more when your device is charging or docked.

Ambient display

  • Set your device to show lock screen content when a notification comes.

Visibility settings

Font size

  • Change the font size your device shows.

Display size

  • Change the display size your device shows.

When device is rotated

  • Change how your screen shows what’s on the screen when you turn your device. (This option won’t show if you’ve turned off “Auto-rotate screen” in accessibility settings.)

Check or change app settings

You can see information about, and change settings for, the apps on your Android phone or tablet.

Note: Android isn’t the same on all devices. These instructions are for devices running Android 7.0 and up.

Change app settings

  • Open your device’s Settings app .
  • Under “Device,” tap Apps.
  • Tap the desired app.
  • To edit a setting, tap it. Available settings vary by app.
    • Uninstall or disable
    • Storage
    • Data usage
    • Permissions
    • Notifications
    • Open by default
    • Battery
    • Memory

For more app settings, look inside each individual app for its settings menu. Change app permissions, defaults & preferences You can see a list of apps that have a certain setting, like permission to view your Calendar, instead of checking each app one-by-one.

  • Open your device’s Settings app .
  • Under “Device,” tap Apps.
  • At the top right, tap Settings .
  • To edit a setting, tap it. Available settings vary by device and Android version.
    • App permissions
    • Opening links
    • Assist & voice input
      • Assist app
      • Use text from screen
      • Use screenshot
    • Default apps
      • Home app
      • Browser app
    • Special access
      • Battery optimization
      • Device administrators: See or remove device administrators.
      • Do Not Disturb access
      • Draw over other apps: Control which apps can show on top of other apps you’re using.
      • VR helper services: Control which apps can access VR.
      • Modify system settings: Control which apps can change system settings.
      • Notification access
      • Unrestricted data access: Control which apps have unrestricted data access.

Usage access: Manage which apps have access to app-usage data on your device.

Add or remove an account

You can add accounts to your Android phone or tablet. When you add an account, information associated with that account automatically syncs with your device. To get apps from the Google Play Store, you’ll need an account on your device.

If you’re using a device with multiple users, make sure to sign in as the right user before changing account information.

Note: Android isn’t the same on all devices. These instructions are for devices running Android 7.0 and up.

Add an account to your device

  • Open your device’s Settings app .
  • Under “Personal,” tap Accounts  Add account
  • Tap the type of account you want to add.
    • To add your Google Account, tap Google. When you sign in with a Google Account, the email, contacts, calendar events, and other data associated with that account automatically sync with your device.
    • To add a different personal account, tap Personal (IMAP) or Personal (POP3). You’d generally choose these if you use an email program like Microsoft Outlook or Apple Mail. 
  • Follow the on-screen instructions.
  • If you’re adding accounts, you may need to enter your device’s pattern, PIN, or password for security.

Remove an account from your device

When you remove an account from your device, everything associated with that account is also deleted from your device. This includes email, contacts, and settings.

BLUETOOTH

Connect via Bluetooth

To connect to a Bluetooth device, first turn on your phone or tablet’s Bluetooth. Then, the first time you use a new Bluetooth device, pair it with your phone or tablet. After pairing, devices can connect with each other automatically.

Important: On a tablet that multiple people use, each person can change the overall Bluetooth settings.

Note: Android isn’t the same on all devices. These instructions are for devices running Android 5.0 and up. Turn Bluetooth on or off
  • Open your device’s Settings app .
  • Under “Wireless & networks,” tap Bluetooth.
  • Tap the On/Off switch.

At the top of your screen, a Bluetooth icon  shows when

Tip: To save battery, turn off Bluetooth when you’re not using it. Bluetooth is off in Airplane mode.

Pair & connect a Bluetooth device

Before you can connect to a Bluetooth device, you must pair your phone or tablet with it. After you pair your devices, they stay paired until you unpair them.

While Bluetooth settings is open, nearby devices can see phones and tablets running Android 5.0 and up.

Pair a Bluetooth device

  • Open your tablet or tablet’s Settings app .
  • Under “Wireless & networks,” tap Bluetooth.
  • Make sure Bluetooth is turned on and your device is set to visible.
  • Your phone or tablet will scan for and display all available Bluetooth devices in range. If your Bluetooth device doesn’t show, tap More   Refresh.
  • Tap the name of the Bluetooth device you want to pair with your phone or tablet.
  • Follow the on-screen steps.

Tip: If you need a passcode and don’t have it, try 0000 or 1234 (the most common passcodes).

Connect to a Bluetooth device

After pairing with a Bluetooth device, you can connect to it manually. For example, you can connect manually when you want to switch devices or reconnect after a device comes back in range.

  • Open your phone or tablet’s Settings app .
  • Under “Wireless & networks,” tap Bluetooth.
  • Make sure Bluetooth is turned on.
  • In the list of paired devices, tap a paired but unconnected device.

When your phone or tablet and the Bluetooth device are connected, the device shows as connected in the list

Reset your LG G Pad F to factory settings

You can remove data from your LG G Pad F by resetting it to factory settings.

Important: By performing a factory data reset, all data will be erased from the device. While any data stored in your Google Account will be restored, all apps and their associated data will be uninstalled. Make sure you back up your data before you do a factory data reset.

Before you start

Backup your data

Make sure that your photos, files, and other data on your device are backed up before you reset your device.

Plug your device into a power source

Erasing your data may take some time, so make sure that you plug your device into a power source before you start.

Reset your device

  • Open your device’s Settings app .
  • Under “Personal,” tap Backup & reset.
  • Tap Factory data reset  Reset tablet. If you have a screen lock, you’ll need to enter your pattern, PIN, or password.
  • When prompted, tap Erase everything to erase all data from your device’s internal storage.
  • When your device has finished erasing, select the option to reboot your device.
GET IN TOUCH

Get support by phone, chat, email or through video communication.

Our Support Team is available Monday - Saturday from 10AM to 7PM ET.

Live Chat

Initiate chat

Call

Give us a call

800-729-0083

Text Message

Send us a text message

800-729-0083

MAIL

RAZ Mobility

1934 Old Gallows Rd. Suite 350
Tysons Corner, VA 22182