First look – Samsung Galaxy S9
Let’s get started.
We’ll guide you through startup and tell you a bit about your phone’s features.
Note: software updates happen frequently, so your phone may look a little different.
Tips & tricks
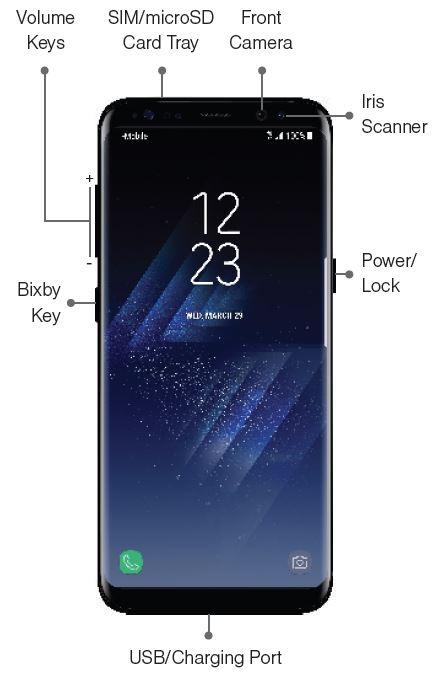
Start: insert the SIM card or cards in your phone and charge up. Then power on and follow the screen prompts to set up your phone.
Help: all of your questions about your new phone are answered right on your phone. Watch a tutorial. Read a how-to. Find out anything about your phone.
Find it: Swipe up and open the app drawer, tap on the Samsung folder and open Samsung+.
Note: Certain apps and features may not be available in all countries.
Start
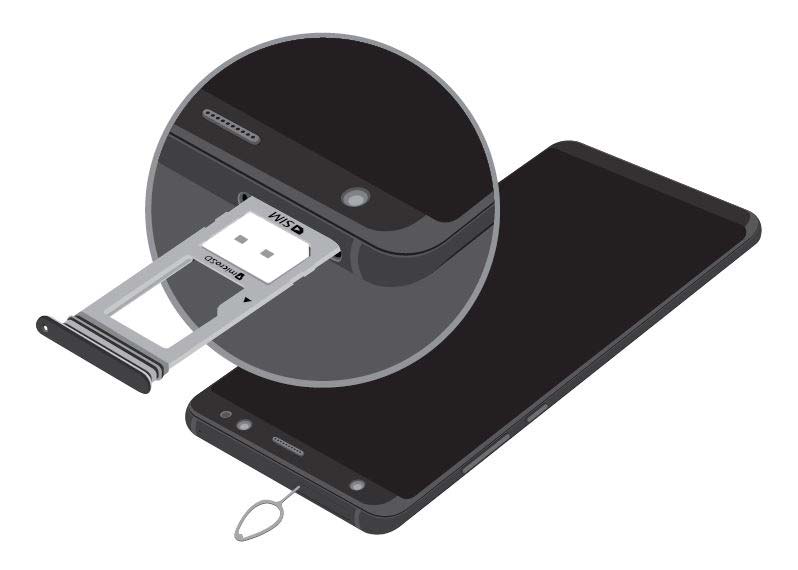
Put in the SIM card
To insert your SIM card, follow these steps.
- Hold the device securely.
- Use the SIM removal tool that came with your device to open the SIM card tray.
- Carefully place the new SIM card into the tray with the carrier logo facing upward.
Note: You must use a Nano SIM card.
Optional: Insert memory card
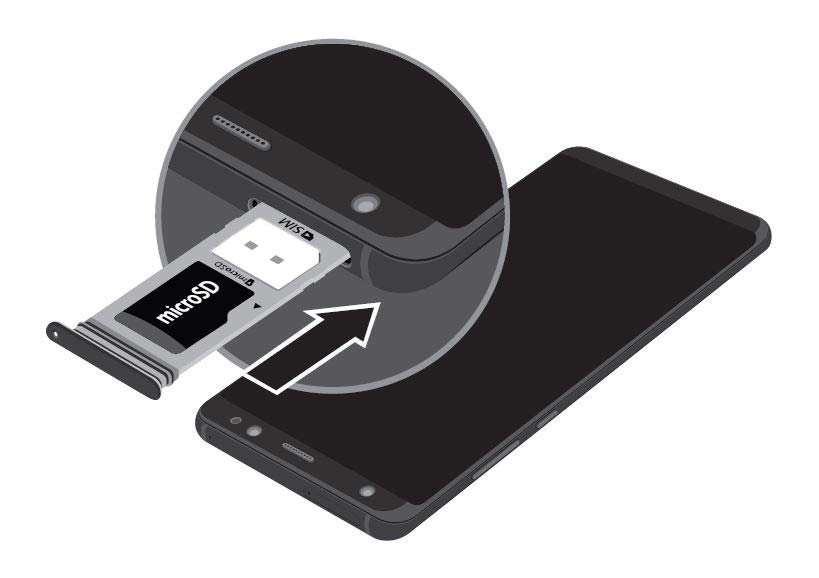
To Insert Your Memory Card
- Hold the device securely.
- Use the tool that came with your device to open the SIM/microSD™ card tray.
- Carefully place the memory card into the tray with the gold contact facing downward.
- Gently push the tray into the slot
Charge the Device
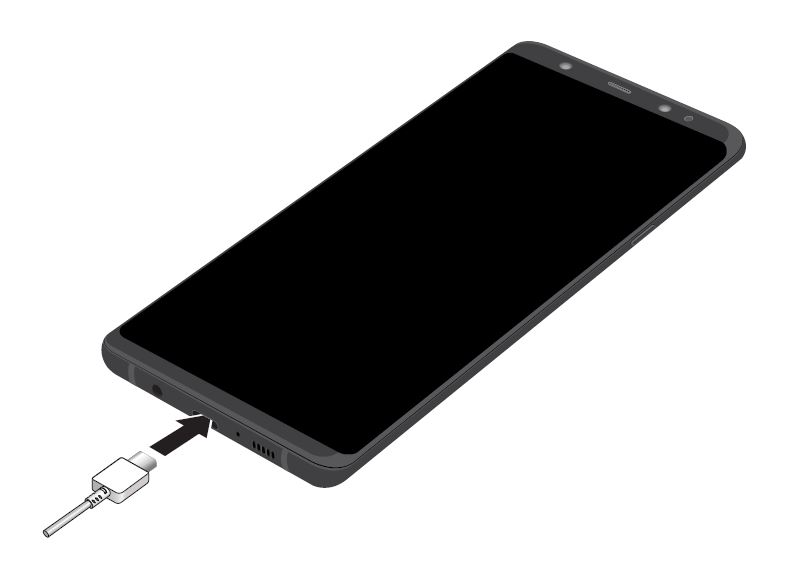
Before turning on your phone, charge it fully.
Your device comes with an Adaptive Fast Charging charger and a USB cable. Plug the smaller end of the cable into the USB/charger port on your device and the larger end into the charger. Then plug the charger into an electrical outlet to charge the device.
Note: Use only charging devices and batteries approved by Samsung. Samsung accessories are designed for your device to maximize battery life. Using other accessories may invalidate your warranty and may cause damage.
Turn the Device On and Off
- To turn On, press and hold the Power/Lock key.
- To turn Off, press and hold Power/Lock key and follow the prompts.
Lock and Unlock the Screen
Use your device’s screen lock features to secure your device.
- To Lock, press the Power/Lock key.
- To Unlock, press the Power/Lock key then swipe your finger across the screen.
Configure Your Device
When you first turn on your device, you need to set up a few things.
- Select a language and tap START or tap ACCESSIBILITY.
- Follow the prompts to complete the setup process.
Home Screen
The Home screen is the starting point for using your device.
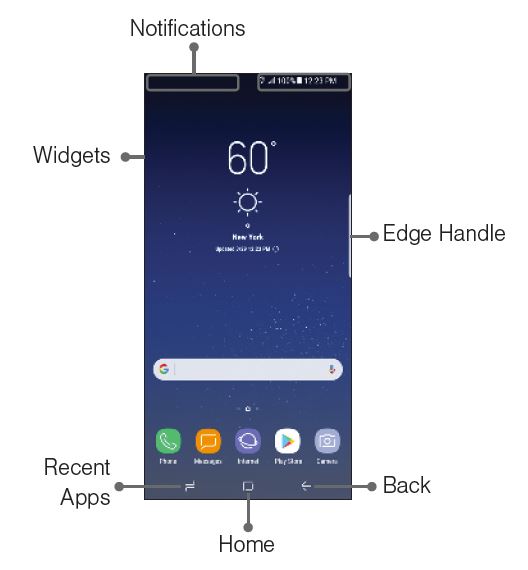
- Swipe up to open the Apps panel.
- Swipe right or left to access additional screens.
- Swipe the Edge handle to access Edge panels.
Volume and Ringtones
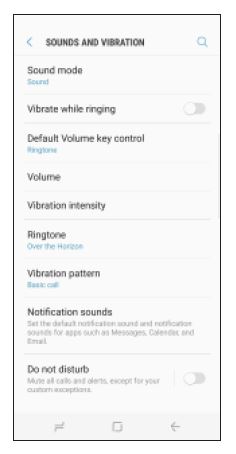
- From the Home screen, swipe up for Apps and then tap Settings g Sounds and vibration.
- Tap Volume to increase or decrease device volume settings.
- Tap Ringtone to select a ringtone.
Edge Screen
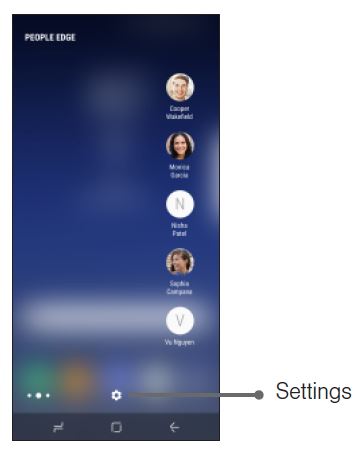
The Edge screen provides a shortcut to call, text or email favorite contacts and much more.
Using the Edge Screen
- From the Home screen, swipe the Edge panel handle to display the Edge panels.
- Swipe left or right to view Edge screens.
Apps
Find new apps to download and install on your device.
Play Store: Download new apps from the Google Play store. Visit play.google.com/store/apps to learn more.
Galaxy Apps: view and download Samsung apps that are optimized for use with Galaxy devices. Visit www.samsung.com/levant/apps/galaxy-apps
Samsung Smart Switch
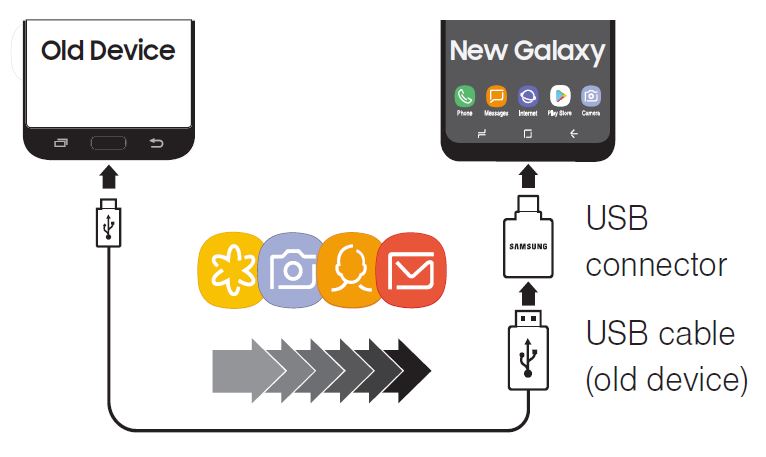
Easily transfer your photos, videos, music, apps and more with Samsung Smart Switch™. Use the USB connector (that came with your new device) to transfer content.
Select Smart Switch during setup, or open it later from the Home screen by swiping up for Apps and tapping Settings > Cloud and accounts > Smart Switch.
For more information and a list of compatible devices visit www.samsung.com/rs/apps/smart-switch
Calls
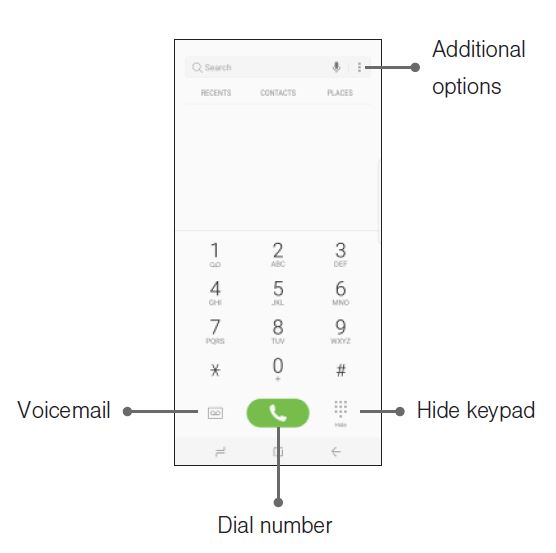
Make a Call
- From the Home screen, tap Phone.
Answer a Call
- From the incoming call screen, touch and slide Answer in any direction.
End a Call
- From the call screen, tap End call.
Reject a Call
- From the incoming call screen, touch and slide Reject in any direction to route the call to your voicemail system.
Voicemail
Access Voicemail
- From the Home screen, tap Phone.
- Touch and hold the number 1.
Contacts
Create a New Contact
- From the Home screen, swipe up for Apps and then tap Contacts.
- Tap Add New Contacts.
- Enter the desired information.
- Tap SAVE to store the new entry.
Add a Number to a Contact
- From the Home screen, swipe up for Apps and then tap Contacts.
- Tap a contact name from the list and tap Details > EDIT.
- Tap within the phone number area and enter a new phone number.
- Tap SAVE to complete and store the new entry.
Messages
Create and send a message using the Messages app.
- From the Home screen, tap Messages.
- Tap to add a recipient.
- Enter either the recipient’s phone number or email address.
- Tap to compose a message.
- Tap the Enter message field and use the keypad to enter a message.
- Tap Attach and select a file type.
- Tap Emoticons to choose an emoticon.
- Review the message and tap Send.
Gmail
Use Gmail™ to send and receive email. Before you can access Gmail, you must first sign in or create a new Google account.
- From the Home screen, swipe up for Apps and then tap Google folder > Gmail.
- Tap Add an email address to create a new account or to log into an existing Gmail account.
- Tap TAKE ME TO GMAIL if you have an account set up on your device.
Set Up Email Accounts
Configure Email for most accounts in just a few steps.
- From the Home screen, swipe up for Apps and then tap Email.
- Enter your email address and password into the appropriate fields and tap SIGN IN.
- Follow the prompts to complete setup.
- Tap DONE to store the new account.
Connections
Connect to Bluetooth
- From the Home screen, swipe up for Apps and then tap Settings > Connections > Wi-Fi.
- Tap On/Off to turn on Bluetooth®.
- Tap a device from the list to initiate pairing.
- Enter the passkey/PIN code, if required, and tap OK.
Connect to Wi-Fi
- From the Home screen, swipe up for Apps and then tap Settings > Connections > Bluetooth.
- Tap On/Off to turn on Wi-Fi®.
- Tap a device from the list to initiate pairing.
- Tap a network and enter the password if prompted. When connected displays in the Status bar.
Security Screen Lock
The Screen lock menu allows you to choose from a variety of locking features.
- From the Home screen, swipe up for Apps and then tap Settings > Lock screen and security > Screen lock type.
Face Recognition
- From the Home screen, swipe up for Apps and then tap Settings > Lock screen and security > Face Recognition.
- Tap CONTINUE to begin iris registration and follow the prompts.
- Follow the prompts to create a Pattern, PIN, or Password.
Fingerprint Scanner
- From the Home screen, swipe up for Apps and then tap Settings > Lock screen and security > Fingerprint Scanner
- Tap CONTINUE to begin fingerprint registration and follow the prompts.
- Follow the prompts to create a Pattern, PIN, or Password. 33
Iris Scanner – Use your eyes to unlock your device
- From the Home screen, swipe up for Apps and then tap Settings > Lock screen and security > Iris Scanner.
- Tap CONTINUE to begin iris registration and follow the prompts.
- Follow the prompts to create a Pattern, PIN, or Password. Note:
*The Iris Scanner is not intended for use as a medical device; biometric data collected and stored locally by the Iris Scanner is not intended for any diagnostic, therapeutic, or preventative medical purposes.
EMERGENCY DIALING
Although all phones are equipped with 9-1-1 emergency calling, this phone may or may not permit its location to be approximated during a 9-1-1 call. Availability of this feature depends on upgrades to the (a) wireless network and (b) 9-1-1 calling system that are required to be installed by the local 9-1-1 response agency or public safety answering point (PSAP); these upgrades may not be available everywhere. This approximation of the phone’s location and the transmittal of location information are subject to emergency situations, transmission limits, network problems/limitations, interconnecting carrier problems, your phone, buildings/tunnels, signal strength and atmospheric/topographical conditions, and may be curtailed, interrupted, dropped or refused. The phone’s approximate location is transmitted to the local 9-1-1 response agency or PSAP while the call is in progress; this approximation is intended solely to aid the PSAP in dispatching emergency assistance or to limit the search area for emergency services personnel. You should not rely solely on a phone for essential communications (such as a medical or other emergency).